Understanding Prototypal Inheritance and Object Creation Patterns in JavaScript
JavaScript is a majestic, powerful, nimble, and wild horse
 © Jan Canty, Unsplash
Probably the least understood aspect of JavaScript, the prototypal inheritance model is also coincidentally its most salient and powerful feature. This flexible system enables a rich variety of ways to create objects.
What is it? How does it work? Why is it powerful? How is it different from classical inheritance (i.e. with classes)?
We’ll start by laying down some foundations, and we’ll then proceed to tackle each object creation pattern, understanding the pros and cons of each.
Table of Contents
- 1. Fundamentals of Functions, Execution Contexts, and Closures
- 2. Why Objects and Why Object Creation Patterns?
- 3. Pattern 1: Factory
- 4. Pattern 2: Constructor
- 5. Pattern 3: Prototype
- 6. Pattern 4: Pseudo-Classical
- 7. Pattern 5: Class
- 8. Pattern 6: Objects Linking to Other Objects (OLOO)
- 9. Recap and Summary
1. Fundamentals of Functions, Execution Contexts, and Closures
1.1 Functions as Objects
When we create a function, whether using a function declaration or a function expression (including named arrow functions), we are actually creating an object.
Functions, just like Arrays, are actually objects in JavaScript–though of course they are a more specialized type of object. They can do everything objects can do, and more.
So, for example, this is possible:
function displayAge(obj) {
  console.log(obj.age);
}

displayAge.age = 28;
displayAge["age"]; // returns 28
displayAge(displayAge); // logs 28
What’s going on here? We are creating a function using a function declaration, but then afterward we are actually adding a property (or key) of age onto this function, and setting its value to 28.
Whaaaat? Yes, it’s possible, because in JS, functions are first-class objects, which means we can use them just like any other variable: pass them as arguments, include them in a collection or array, return them from functions, etc.
Since they are objects, we can keep adding as many properties as we want, too. We can use either [bracket notation] or the dot notation (like above) to add any key/value pairs to the function.
When we then call displayAge() on the last line, passing itself as an argument, we are able to output the value of age to the console.
We can also do the inverse–that is, add a function as a property inside an object (which makes them methods). For example, using three different ways to create methods sleep, meow, and protest:
let garfield = {
  name: "Garfield",
  // 1. traditional way
  sleep: function () {
    console.log(`I, ${this.name}, am sleeping!`);
  },
  // 2. shorthand notation (syntactic sugar)
  meow(times) {
    console.log(`${this.name} says:`, "meow! ".repeat(times));
  },
  // 3. arrow function
  protest: () => {
    console.log(`My name is ${garfield.name}, not '${this.name}'!`);
  },
};

garfield.sleep(); // logs "I, Garfield, am sleeping!"
garfield.meow(3); // logs "Garfield says: meow! meow! meow! "
garfield.protest(); // logs "My name is Garfield, not 'undefined'!"
1.2 Execution Contexts and this
Most functions create their own execution contexts. For practical purposes, a new execution context merely means an update to which object the this keyword implicitly refers to. As we’ll see, only one type of function does not create its own execution context.
There are ways to call a function with an explicit execution context (e.g. using call(), apply(), and bind()), but that’s beyond the scope of this post, and we’ll focus on implicit execution contexts here.
When we use a method invocation, the implicit execution context for that method is typically the calling object itself. So, in the above, this inside of garfield.sleep() points to (or references) the garfield object. That’s why calling this.name from inside the garfield.sleep() and garfield.meow() methods properly returned the string 'Garfield'.
Why didn’t this also work for our third method call, garfield.protest()? Because arrow functions are unique in that they don’t create their own execution contexts–they simply inherit the external execution context of wherever they are defined–i.e., lexically. That is to say, the object that this references inside the arrow function is the same object that this references just outside the arrow function.
Here, the arrow function is actually defined within the global execution context, because object literals similarly don’t create their own execution contexts. Because this is pointing to the global object both outside and inside the arrow function, and because the global object in our example does not have a name property, this.name therefore returns undefined.
Note: The global object is outside the scope of this post, especially because it is treated differently in browsers vs. in Node.js, and in strict mode vs. loose mode.
1.2.1 Arrow Function use case
So what would be a perfect use case for specifically taking advantage of the no-new-execution-context-creating nature of arrow functions?
Let’s say we have an object (layer 0), within which we have a method that was declared traditionally–hence creating its own execution context (layer 1) when called as a method.
What if, within that layer 1 method, we wanted to use a function that was able to implicitly refer to the calling object (from layer 0)?
If we used a normal function, we’d create a new execution context (i.e. layer 2), so we’d change what this referred to within that layer 2, thereby losing the reference to the object from layer 0. This situation would be an example of context loss. Interestingly, this situation would cause this to point back to the global object whenever this is used in layer 2.
But if we use an arrow function instead, this would still be referencing the object, because we’d still be in layer 1’s execution context even when inside the arrow function.
1.3 Closures and Private Values
Another important consideration is shielding certain data (including methods) to render them inaccessible from an external context.
The simplest example is the case of a counter. Let’s say we want to have an object that can increment itself using an internal method. But we also want to shield the counter so that it cannot be reset or otherwise changed. The only way to change the value of the counter should be through the method.
We couldn’t just use an object literal:
let myCounter = {
  value: 0,
  increment(number = 1) {
    this.value += number;
    return this.value;
  },
};

myCounter.increment();
myCounter.value = 50; // we're able to reset or change the counter value
A solution is to use a function that returns an object with methods that incorporate closures:
function createCounter(initialValue = 0) {
  let enclosedValue = initialValue;
  let obj = {
    increment(number = 1) {
      enclosedValue += number;
      return enclosedValue;
    },
    getValue: () => enclosedValue,
  };
  return obj;
}

let counter = createCounter(2);
counter.increment(3); // returns 5
counter.increment(); // returns 6
counter.getValue(); // returns 6
counter.enclosedValue; // returns undefined
In this example, the enclosedValue variable was enclosed within both the increment() and the getValue() methods of obj. Both methods have access to this variable, and increment() can even change it, but nothing and no one else can.
Note that the arrow function worked just as well as the standard function expression for this purpose. That’s as expected, since we’re not doing anyhing with this here.
2. Why Objects and Why Object Creation Patterns?
Because objects are the most versatile and powerful data type of Javascript, we absolutely need to master how to efficiently create, manage, and use them.
We need molds we can use to quickly generate objects that have the same properties and methods.
In fact, shaping similar objects is so critical that there are actually many ways to accomplish this, each with its own advantages and disadvantages.
We’ll start out with the most basic pattern, and gradually explore more and more complex patterns. In the process, we’ll also appreciate why JS’s prototypal inheritance model is so powerful.
3. Pattern 1: Factory
The most basic way to repeatedly create an object with the same properties is to use a function as a factory that creates and returns objects.
That way, the function can take arguments and initialize the object with some custom values (i.e. state), and all objects returned will have the same set of properties and methods.
We’ve already tasted this in the closure example from section 1.3 above. Let’s see another example, this time where we return an object literal immediately without first declaring an object:
function makeHorse(name, color) {
  return {
    name: name,
    color: color,
    jump() {
      console.log(`${this.name} is jumping!`);
    },
  };
}
Object Property Assignment Syntactic Sugar
When the object’s property name and the variable containing the value (or reference) to be assigned to that property are the same, JS gives us some syntactic sugar to make things easier, so below does the exact same thing as above:
function makeHorse(name, color) {
  return {
    name,
    color,
    jump() {
      console.log(`${this.name} is jumping!`);
    },
  };
}
We can then declare any new variable to capture the return value from running this function:
let clyde = makeHorse("Clyde", "brown");
let bonnie = makeHorse("Bonnie", "black");
Both objects have their own copies of the jump method, and their own custom state for the name and color properties.
This demonstrates how we can use functions as object factories.
Factory Pattern: Pros and Cons
| Advantages | Disadvantages | |
|---|---|---|
| 1 | Capture both custom states and common behavior | Duplication: every object contains copies of the same methods |
| 2 | Simplicity | Inability to distinguish whether objects were created from the same mold |
4. Pattern 2: Constructor
A slightly more elegant approach is to use functions in a particular way that combines the this and the new keywords.
function MakeHorse(name, color) {
  this.name = name;
  this.color = color;
  this.jump = function () {
    console.log(`${this.name} is jumping!`);
  };
  return this; // (optional but can be useful)
}

let clyde = new MakeHorse("Clyde", "brown");
let bonnie = new MakeHorse("Bonnie", "black");
The first thing to notice is that when naming constructors, the convention is to use PascalCase instead of camelCase (hence MakeHorse instead of makeHorse). Everything will still work just the same if you don’t, but following the convention more explicitly lets anyone reading your code know that this function is a constructor function, and should be used as such.
There are two other main differences with the Factory pattern:
- the fact that instead of returning an object, we are defining properties directly onto the
thisobject, and - the use of the
newkeyword when instantiating new objects with the constructor.
The two are actually related. In this situation, this actually refers to the new object that new created. If we forget to use the new keyword, our constructor as defined above wouldn’t work, because as we’ve seen, this would then refer to the global object.
Creating our objects with a constructor gives us a distinct benefit relative to the Factory pattern: now we can tell whether an object was made from a particular constructor, i.e. from a particular mold.
If we call clyde.constructor or bonnie.constructor, for example, they will both return the MakeHorse function we used as our constructor. Note that we need to use new in order to take advantage of this feature of constructors.
The new operator is in fact what turns our function into a constructor.
Other objects that are created using either an object literal syntax or the Factory pattern also have a native constructor property, but they will all return the Object function, since that’s what’s implicitly being used as a constructor in those cases.
For example:
console.log(clyde.constructor); // logs [Function: MakeHorse]
console.log(clyde.constructor === MakeHorse); // logs true
let objLiteral = {
  name: "John",
  age: 27,
};
console.log(objLiteral.constructor === Object); // logs true
Another useful operator to know about and use in the context of constructors is instanceof, which returns true if the left operand is an instance of the right operand (and the right operand has to be a function).
For example, we could do:
console.log(clyde instanceof MakeHorse); // logs true
With constructors, we gained the ability to identify whether objects were made from the same constructor. But we still have the problem of duplication and inefficiency–each instance has copies of all methods.
We can use the hasOwnProperty(), Object.keys(), and/or Object.getOwnPropertyNames() methods to test this:
clyde.hasOwnProperty("jump"); // returns true
Object.keys(clyde); // returns ['name', 'color', 'jump']
Object.getOwnPropertyNames(); // returns ['name', 'color', 'jump']
The main difference between Object.keys() and Object.getOwnPropertyNames() is that the former returns only the enumerable properties directly on the object, whereas the latter returns all properties directly on the object. In this example, they return the same thing.
Constructor Pattern: Pros and Cons
| Advantages | Disadvantages | |
|---|---|---|
| 1 | Capture both custom states and common behavior | Duplication: every object contains copies of the same methods |
| 2 | Ability to distinguish whether objects were created from the same mold |
5. Pattern 3: Prototype
At last, we come to one of the most useful parts of Javascript: the concept of prototypes.
You may have noticed that despite the benefits of Constructors, they still have the same problem as Factories when it comes to duplication–i.e., every object created with a constructor has copies of the same methods.
Prototypes offer us a way to deal with this problem.
Function.prototype
Every function created, whether it is later used as a constructor or not, also has a prototype property. This property points to an object that will be the mold for every object created by this function, should it be used as a constructor (i.e. with new).
For example, using our MakeHorse constructor:
function MakeHorse() {}

console.log(MakeHorse.prototype); // logs MakeHorse {}
console.log(typeof MakeHorse.prototype); // logs object
How is this helpful? Well, we can directly tweak and mutate this prototype object however we like. We can then use either the new keyword or the Object.create() method to create instance objects that will have access to the same methods that are on that prototype, without polluting the instance object directly.
Let’s look at an example, which showcases two different ways to instantiate objects using this pattern–one with new and the other with Object.create():
// Step 1: create a Function with no content
function MakeHorse() {}

// Step 2: Mutate that Function's prototype by adding however many
//  methods and properties you want onto the object the property points to
MakeHorse.prototype.jump = function () {
  console.log(`${this.name} is jumping!`);
};

// Step 3: instantiate new objects using either...
// ...new Function
let clyde = new MakeHorse();
clyde.name = "Clyde";

// or Object.create(Function.prototype)
let bonnie = Object.create(MakeHorse.prototype);
bonnie.name = "Bonnie";
Delegation
The instance objects are said to delegate their methods to the prototype object from which they are made. Here, clyde and bonnie are not encumbered by the jump method. Running Object.keys(clyde) will return the array ['name'] which, thankfully, does not include 'jump'. Yet clyde can still jump because it has access to the jump method in its prototype object, MakeHorse.prototype. Thank you, delegation.
“Dunder Proto” or __proto__
Note that every object has not only a native constructor property that identifies the constructor function that created it, but also another native property that identifies the mold object it follows (and hence the mold whose methods and properties it has access to).
This property is __proto__ and pronounced dunder proto, short for “double underscore proto double underscore."
After running the above code to create clyde and bonnie, we can then do the following below:
console.log(clyde.__proto__ === MakeHorse.prototype); // logs true
console.log(bonnie.__proto__ === MakeHorse.prototype); // logs true
console.log(clyde.__proto__ === bonnie.__proto__); // logs true
Object’s prototype getter and setter methods
It’s important to note that __proto__ is now deprecated, and the preferred way to access the mold of an object is to call Object.getPrototypeOf() like so:
console.log(Object.getPrototypeOf(clyde) === MakeHorse.prototype); // logs true
You can also directly change or set the mold of any object like so:
let newHorse = {};
Object.setPrototypeOf(newHorse, MakeHorse.prototype);
Setting an object’s prototype through the Object.setPrototypeOf() method also automatically updates that object’s constructor property to point to the prototype object’s constructor.
With the Prototype pattern, we’ve been able to take advantage of the prototypal nature of JS. But this pattern still has a main weakness.
Prototype Pattern: Pros and Cons
| Advantages | Disadvantages | |
|---|---|---|
| 1 | Only the prototype contains shared methods and values | Need to manually set custom state on each object |
| 2 | Ability to distinguish whether objects were created from the same mold |
6. Pattern 4: Pseudo-classical
The Pseudo-Classical model essentially combines the Constructor pattern with the Prototype pattern, resulting in an approach that mostly works the same way as the classical inheritance model.
Namely, we use a Constructor to set up the custom state of any future instance object, and then use the Constructor’s prototype to capture all the shared behavior that our objects will need (i.e. all the instance methods).
function MakeHorse(name, color) {
  this.name = name;
  this.color = color;
}

MakeHorse.prototype.jump = function () {
  console.log(`${this.name} is jumping!`);
};

let clyde = new MakeHorse("Clyde", "brown");
let bonnie = new MakeHorse("Bonnie", "black");
Now our instance objects have the best of both worlds: they contain custom state and access to shared methods, but are also not bloated with copies of those methods.
Note that if we used Object.create() here to instantiate our objects, we would not be able to take advantage of the Constructor function to set the custom state for our objects. To do that, we have to use the new keyword.
Pseudo-classical Pattern: Pros and Cons
| Advantages | Disadvantages | |
|---|---|---|
| 1 | Can easily set custom states | Somewhat clunky |
| 2 | Only the prototype contains shared methods and values | Doesn’t feel like a native JS pattern |
| 3 | Ability to distinguish whether objects were created from the same mold |
7. Pattern 5: Class
The Class pattern works exactly the same way under the hood as the pseudo-classical pattern, but it provides some significant syntactic sugar to make the approach a lot easier and intuitive.
Here we can use the class keyword to define a class that mimics and superficially works the same way as defining classes in other OOP languages like Ruby, Python, or Java.
Within this class, we have:
- a
constructor()function within which we set the custom state, and - however many additional instance methods we want that object to have access to (i.e. what we would have had to define as methods of the Function.prototype object in the pseudo-classical or prototype model).
Our favorite horse-making function thus becomes:
class MakeHorse {
  constructor(name, color) {
    this.name = name;
    this.color = color;
  }

  jump() {
    console.log(`${this.name} is jumping!`);
  }
}

let clyde = new MakeHorse("Clyde", "brown");
let bonnie = new MakeHorse("Bonnie", "black");
I think you can agree this is A LOT nicer to use than the pseudo-classical pattern we saw previously. We no longer need to keep patching methods onto the Constructor’s prototype.
Just like we can have one class inherit from a parent or superclass in classical inheritance languages, we can also use this pattern to accomplish the same thing in Javascript, using the extends keyword.
Let’s say we want every horse to also inherit methods from an Animal superclass, which allows objects to have a weight, and responds to a gains() method that impacts the animal’s weight.
Let’s modify our code above to handle this:
class Animal {
  constructor(weight) {
    this.weight = weight;
  }

  gains(pounds) {
    this.weight += pounds;
  }
}

class MakeHorse extends Animal {
  constructor(name, color, weight) {
    super(weight);
    this.name = name;
    this.color = color;
  }

  jump() {
    console.log(`${this.name} is jumping!`);
  }
}

let clyde = new MakeHorse("Clyde", "brown", 890);
let bonnie = new MakeHorse("Bonnie", "black", 1280);
We used the super() function to call the constructor function of the parent class. Now our horses also have weight as part of their state, which can be tweaked by accessing the gains() method.
Note that we can still call constructor on any created objects, and we will get a function back with the same name as our class. This drives the point that the class structure is truly just syntactic sugar, and under the hood, the same dynamic as the pseudo-classical pattern is happening.
To beat a dead horse (no pun intended):
class Horse {}

let clyde = new Horse();
console.log(clyde.constructor === Horse); // logs true
console.log(typeof Horse === "function"); // logs true
Class Pattern: Pros and Cons
| Advantages | Disadvantages | |
|---|---|---|
| 1 | Can easily set custom states | Doesn’t let Javascript be Javascript (for my West Wing fans out there) |
| 2 | Only the prototype contains shared methods and values | |
| 3 | Ability to distinguish whether objects were created from the same mold | |
| 4 | Feels familiar to those coming from a classical inheritance language | |
| 5 | Can use extends and super() to mimic descendance |
8. Pattern 6: Objects Linking to Other Objects (OLOO)
The Objects Linking to Other Objects (OLOO) pattern is the pattern that Javascript was built for. The brainchild of Kyle Simpson, OLOO completely embraces Javascript’s prototypal inheritance model and jettisons the class model entirely.
The idea here is that all we need to do is define an object that itself contains a constructor method (by convention this method is called init), and then simply use this object as the mold from which we create all instances of this object, using Object.create().
Here’s how it would work:
const Horse = {
  init(name, color) {
    this.name = name;
    this.color = color;
  },
  jump() {
    console.log(`${this.name} is jumping!`);
  },
};
let clyde = Object.create(Horse);
clyde.init("Clyde", "brown");
let bonnie = Object.create(Horse);
bonnie.init("Bonnie", "black");
If we want to be even more succinct and elegant, we can also add a return value to our init() method, which would allow us to declare instances and immediately initialize them on the same line, like so:
const Horse = {
  init(name, color) {
    this.name = name;
    this.color = color;
    return this;
  },
  jump() {
    console.log(`${this.name} is jumping!`);
  },
};
let clyde = Object.create(Horse).init("Clyde", "brown");
let bonnie = Object.create(Horse).init("Bonnie", "black");
That was previously not possible in our prior example, because our init() method was implicitly returning undefined.
Note that out of precaution, it’s best to use const to declare Mold objects. That way, you can still mutate it and add methods to it, without the risk of pointing the Mold Object to a different location (i.e. reassignment), thereby breaking any connection that had already been made from past instantiations / links.
It’s probably not a good idea to use Object.freeze() on it, since that wouldn’t even let you mutate the Mold, and freezing is not a reversible procedure. Moreover, const seems innocuous and a sufficient level of protection.
Note too, that we also used PascalCase for this Mold object name, again, as a convention to distinguish it from other objects, especially from instances of this Mold object, which would use the normal camelCase.
Inheritance Through OLOO
To accomplish the same inheritance system as we did with the class pattern, here’s what we could do:
const Animal = {
  init(weight) {
    this.weight = weight;
    return this;
  },
  gains(pounds) {
    this.weight += pounds;
  },
};

const Horse = {
  init(name, color, weight) {
    this.name = name;
    this.color = color;
    this.color = weight;
    return this;
  },
  jump() {
    console.log(`${this.name} is jumping!`);
  },
};

Object.setPrototypeOf(Horse, Animal); // or instead: Horse.__proto__ = Animal

let clyde = Object.create(Horse).init("Clyde", "brown", 890);
let bonnie = Object.create(Horse).init("Bonnie", "black", 1280);
Prototype Chain
Just like we have a method lookup chain with the classical inheritance model, the prototypal inheritance model sets up the prototype chain lookup process.
For example, the prototype of clyde is Horse, and the prototype of Horse is Animal, and finally the prototype of Animal is Object.prototype. The prototype of Object.prototype is null, so we can think of null as the tail end of this chain.
clyde => Horse => Animal => Object.prototype => null
When searching for a method or property, JS first searches for it on the object itself, and then goes up through the prototype chain until it finds it. If it doesn’t find it before it gets to the null tail end, it throws an error.
If there are more than one object in the chain with the same property, JS returns the value of the first one it finds. This allows for overriding inherited properties and methods.
To determine if a prototype is at any point along the prototype chain of an instance object, we can use the isPrototypeOf() method. For example:
Animal.isPrototypeOf(clyde); // returns true
Horse.isPrototypeOf(clyde); // returns true
Object.prototype.isPrototypeOf(clyde); // returns true
function Pumpkin() {}

Pumpkin.prototype.isPrototypeOf(clyde); // returns false
The OLOO model is thus deceptively simple, but incredibly powerful.
OLOO Pattern: Pros and Cons
| Advantages | Disadvantages | |
|---|---|---|
| 1 | Can easily set custom states | New concept to get used to for those coming from classical inheritance languages |
| 2 | Only the prototype contains shared methods and values | The constructor property of objects is not useful anymore, since they all point to the Object function. That means that instanceof is also irrelevant |
| 3 | Ability to distinguish whether objects were created from the same mold | With great power comes great responsibility |
| 4 | Is native to JS and fully embraces the prototypal inheritance approach | |
| 5 | Each object instance has a ready-made, handy method (i.e. init) for setting or changing its state |
|
| 6 | Very easy to retroactively change/mutate any Mold object, thereby immediately granting all objects linked to the Mold with the same methods |
9. Recap and Summary
We’ve seen the six main different types of object creation patterns in JS.
The two most useful, comprehensive, and user-friendly ones are the class pattern and the OLOO pattern.
Let’s use this diagram and go through its five steps to specifically review the prototypal inheritance-based object creation patterns, since those are the most different from the classical patterns that we’re used to.
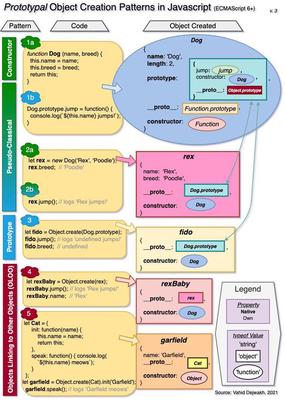
Constructor
The Constructor pattern is accomplished by steps 1a and 2a. In 1a, we create a constructor function Dog, and in 2a we use new to generate an instance called rex. We can see that the rex object (in red) contains two native properties: __proto__ which points to Dog.prototype, and constructor which points to the Dog function.
Prototype
The Prototype pattern is accomplished by steps 1 and 3, with the only caveat that we need only create the Dog function in step 1a (i.e. without any content). We then add a jump method onto the Dog.prototype object in 1b. Note that the Dog.prototype object now also contains the jump method as a result of that.
Finally, in step 3, we create an instance of fido using the Dog.prototype mold. Note that while fido has access to the jump method, he still doesn’t have a name nor a breed, because we never manually gave him these properties, and the Dog.prototype didn’t have them either.
Pseudo-Classical
The Pseudo-Classical pattern is done through steps 1 and 2. This just combines the powers of the Constructor and the Prototype patterns.
OLOO
Finally, the OLOO pattern has two separate examples: 4 and 5.
In step 4, we create an object rexBaby using the mold of rex, which already had been initialized with state. That’s why, although rexBaby does not directly have a name property on itself, it is able to return the value of the name property from rex. Interestingly, rexBaby’s constructor is also Dog, since that was rex’s constructor.
Example 5 shows the more mature way of using OLOO as it was intended, with an init constructor inside the object to be used as a mold.
Both OLOO examples are also interesting because they demonstrate that the .__proto__ of an object is not necessarily the same thing as calling .prototype on that same object’s constructor property. I.e. rexBaby.__proto__ === rexBaby.constructor.prototype would return false.
Vahid Dejwakh
Software Engineer at Microsoft;
Lover of good music and poetry
Vahid writes about interesting ideas at the intersection of software, system design, data, philosophy, psychology, policy, and business. He enjoys coffee and has a palate for spicy and diverse foods.